Bright Pay Connect Payroll Set-up
Introduction
This is a factsheet on how to set up the connection between BrightPay & BrightPay connect
Initial Set Up
For the initial set up in June 2022, we need to set up the connection between all the companies we do payroll for on BrightPay and BrightPay connect. There is a batch connectivity as seen below however when we do have a new payroll sign up, the connection will need to be made.
Invites
We need to invite the employees and employer to the app so that they can set up an account. The director of the company will then need to be added as a Standard User
A standard user typically has access to just one employer in your BrightPay Connect account, although they can be granted access to multiple employers if required which is useful if a client has two companies with us. A standard user can view all employer (and associated employees) information and process employee self-service requests.
Processing Payroll
Complex Payroll
Step 1:
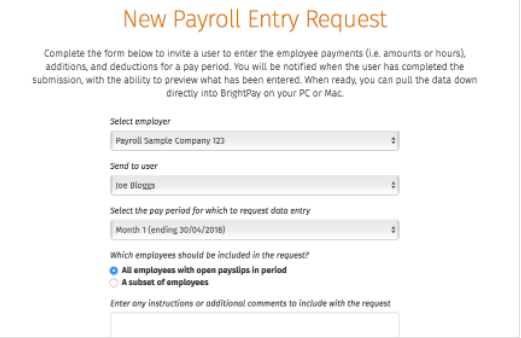
Each payroll cycle, the payroll department will send a Payroll Entry Request to all complex clients. This can be done from within the
BrightPay Connect portal or from the payroll software itself. The client will
receive an email notification requesting them to input the employee hours
including additions and deductions for that pay period.
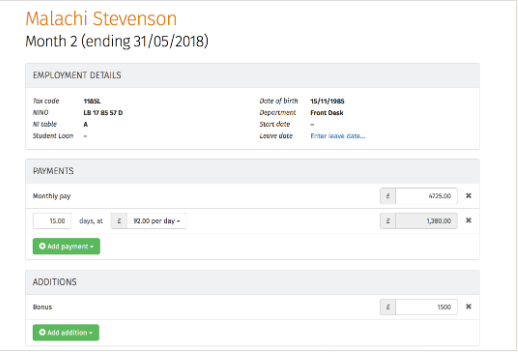
Step 2:
Payroll clients will input the employee payroll hours and payment details on BrightPay Connect. The client also can enter an employee’s additions and deductions on the Payroll Entry Request along with employment information for a starter or new employee
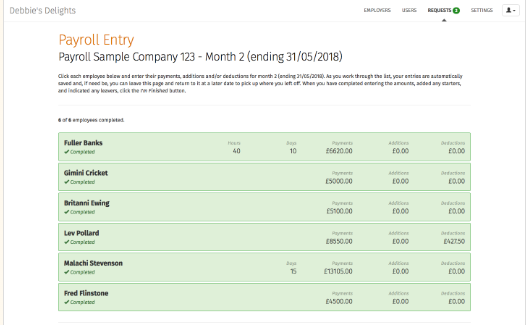
Step 3:
When the Payroll Entry Request has been completed by the client, the payroll details will automatically be added to BrightPay portal ready for processing. We can review details entered by their client and click a button to synchronise the information to add it to the employer file on the payroll software. We can then prepare the payroll summary, and send a Payroll Approval Request to the client.
Step 4:
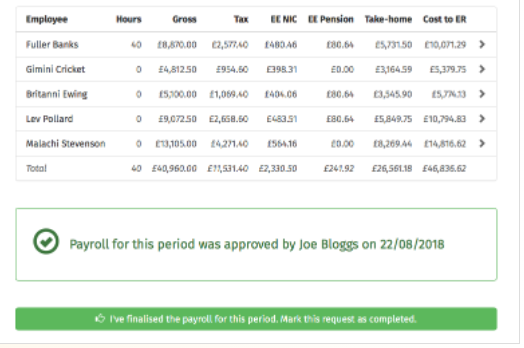
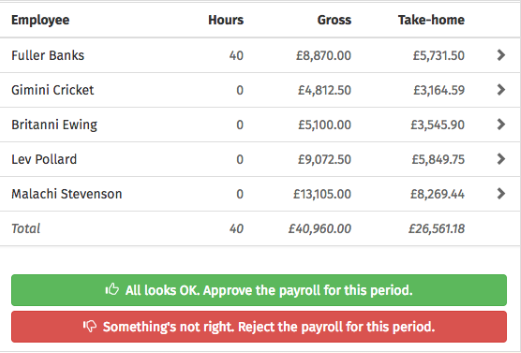
Upon sending a Payroll Approval Request, the payroll summary for the selected pay period is securely sent to the client for final approval through the BrightPay Connect employer dashboard. Clients can view the payroll summary and preview employee’s payslips for the period. They can also select individual employees to look at their pay details for that period, including statutory deductions and net pay details.
Clients can then approve the Payroll Approval Request giving authorisation for us to finalise the payroll for the pay period. Where the details are incorrect, the employer can reject the Payroll Approval Request and explain what needs to be rectified. The onus for the payroll information to be correct lies with the client. The record of the payroll approval request from the client is recorded should anything be questioned or need to be checked.
Step 5:
We will automatically receive a notification that the Payroll Approval Request has been approved and can then finalise and run the payroll. Employee payslips and payroll reports will be automatically available on the BrightPay Connect employer portal. We will still need to send the email to client to making them aware of the payment due to HMRC and how to make payment.